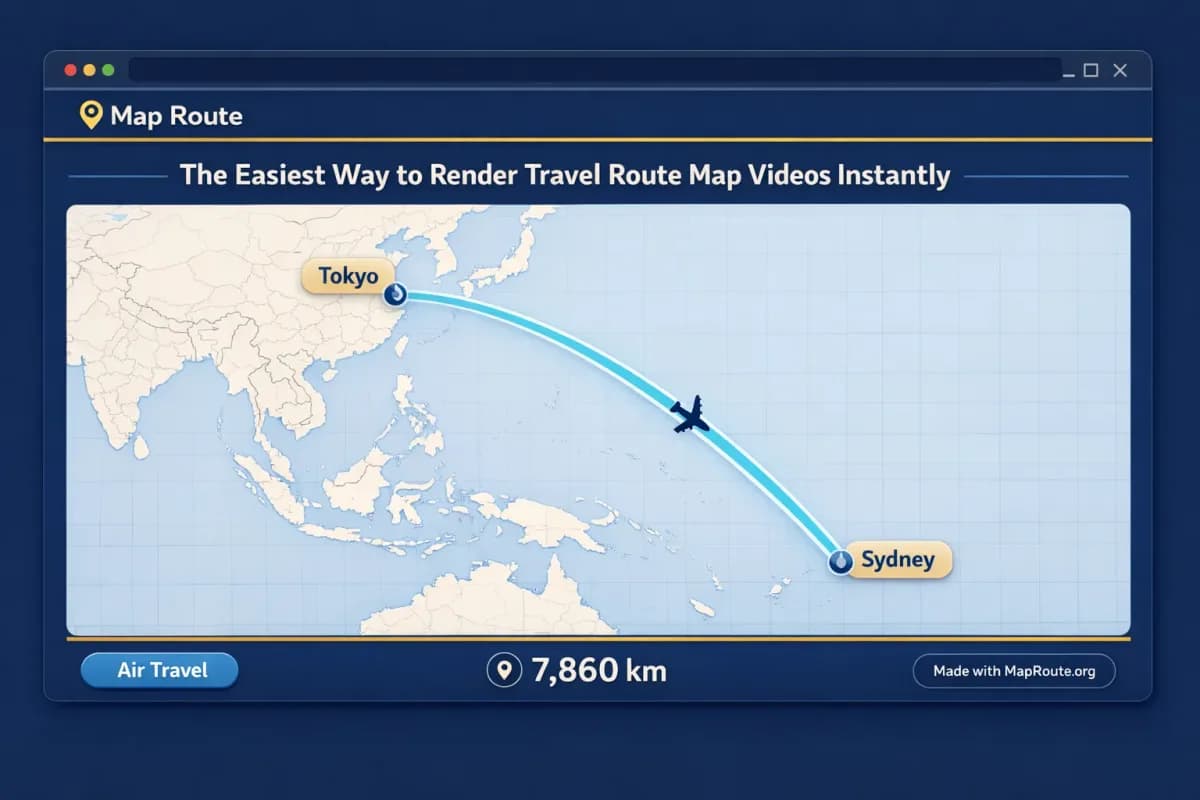
The fastest way to turn routes into videos
The easiest way to render travel route map videos instantly is to do it directly in your browser, without installing a heavy desktop editor or plugins. Map Route lets you generate a smooth travel map animation between two places, then export the clip and finish it in your usual editing app.
For creators, that means you can go from an idea like “Tokyo to Sydney by air corridor” or “Paris to Lyon by rail” to a rendered route video in minutes, not hours. Map Route focuses on one thing: visualizing the geography between a pair of locations as a clean, animated map with a moving marker and distance tracker. You handle voiceover, cuts, and music in your own editor.
This article walks through the exact workflow: how to generate a route, pick the right visualization mode, render and export the animation, and then adapt it for TikTok, Reels, Shorts, or YouTube. Along the way, you’ll see where Map Route is faster than traditional tools—and where you’ll still want your usual NLE or motion graphics stack.
Step‑by‑step: rendering a travel route map video
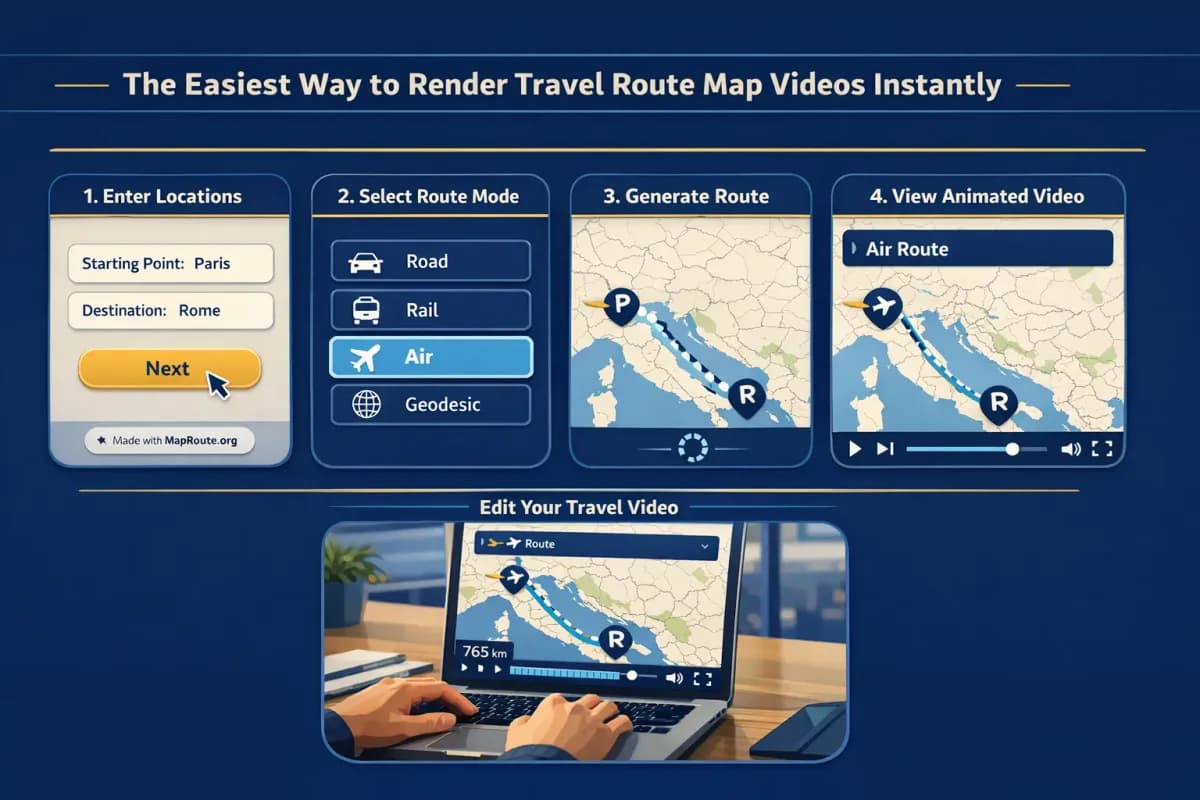
1. Open Map Route in your browser
Map Route is fully browser-based. There’s no app to install and no desktop plugin to configure—just open maproute.org in a modern browser like Chrome or Safari. You can do this on a laptop, desktop, or phone.
Reading the blog and browsing the site does not use up your Map Route generation quota. Only actual generates and exports count.
2. Search your From and To locations
Every Map Route animation is built from exactly two endpoints: a From and a To. There’s no multi-stop editor inside the tool, so think in pairs of locations that tell a clear story segment.
- Click into the From field and start typing at least two characters (city, region, or country).
- Choose from the suggestions, which show a label, context, and a kind badge.
- Repeat for the To field.
For example, to visualize a long-haul flight, set From to “Tokyo” and To to “Sydney”. For a European train-style segment, try “Paris” to “Lyon”.
3. Pick the right visualization mode
Map Route offers four visualization modes, each tuned to a different kind of story:
- Road – a typical road path from a routing engine (not a bus service or timetable).
- Rail – a railway alignment when geometry can be found (not a ticket or proof of service).
- Air corridor – an estimated great-circle line between the two places (not a filed flight).
- Geodesic – a straight-line distance on the globe, useful as a clean, abstract line.
For Tokyo to Sydney, “Air corridor” gives you a clear long-haul arc over the map. For Paris to Lyon, “Rail” is a natural choice if railway geometry is available; otherwise, you can switch to Road or Geodesic if rail cannot be computed.
If road or rail geometry cannot be computed for your pair, the player will say so and offer a geodesic alternative. There is no cruise-ship, ferry, or bus-service mode.
4. Generate and preview the journey
Click Generate Journey. Map Route runs through a short prep pipeline—resolving places, requesting geometry, framing the map, and preparing the journey. If the geometry is quick to fetch, the last stage may flash by almost instantly.
Once ready, you’ll see an animated marker or vehicle icon moving along the computed line, with a km tracker that reflects the length of that line (road path km, railway geometry km, air corridor estimate km, or geodesic km). This is distance, not driving time or airline mileage.
Use the player controls to fine-tune your timing before export:
- Play, Pause, Replay to review the motion.
- Speed options at 1x, 2x, and 4x to see how the route feels at different tempos.
5. Set your aspect ratio by window size
Map Route does not have a manual aspect ratio picker. Instead, the aspect follows your browser window width:
- Below 768px wide (phone or narrow window): 9:16 vertical, ideal for TikTok, Instagram Reels, YouTube Shorts, and Stories.
- 768px and wider: 16:9 landscape, ideal for YouTube videos and vlog intros.
If you want a vertical route for a Reel, generate and preview on your phone—or narrow your desktop browser before you click Generate Journey. For a YouTube intro, keep your browser window wide.
6. Export your travel route video
To actually render and download the video, you need a verified free Map Route account. Logged-out visitors can generate and watch up to three journeys, but they cannot download videos or images.
- Register on maproute.org and verify your email (temporary or disposable emails are not allowed).
- Log in and generate your journey again if needed.
- Click Download Video to trigger a browser capture of the animation you’re seeing.
The export is a browser capture of the player you just watched, including the km tracker and the current aspect ratio. When your browser supports it, the file is MP4 (H.264); otherwise, it falls back to WebM. If capture fails in your browser, the player will still work and show a notice—you can try another browser or device.
All video and image downloads include a “Made with MapRoute.org” watermark. There is currently no watermark-free export.
What makes this route rendering workflow so fast?
For creators used to wrestling with keyframes in a full motion graphics tool, Map Route’s speed comes from focusing on just one job: animating the geography between two points. It handles the map, camera framing, and route motion automatically so you don’t have to.
Automatic camera framing and subtle “3D” pitch
The journey player is built on a MapLibre map with a light political-style basemap. It’s not a 3D globe export and not a set of custom camera keyframes, but it does automatically frame the route so it looks good:
- Short hops are framed tightly so viewers see local detail.
- Long hauls like Tokyo to Sydney are framed more widely to show the continent-scale arc.
- A slight map pitch (around 22° on many mid-range distances, 8° on some longer ones, and 0° on very short or very long routes) adds depth without you touching any controls.
You can’t set custom camera paths, orbit moves, or keyframes—but you also don’t need to spend time animating them. For many travel creators, that trade-off is what makes Map Route feel “instant.”
Distance-based duration that just works
Map Route calculates the base animation duration at 1x from the route distance, usually ending up between about 8 and 28 seconds. That’s long enough to read the labels and see the journey, but short enough to slot into a social clip or vlog sequence without dragging.
You can then preview at 1x, 2x, or 4x to see how it will feel over your planned music or narration once you bring it into your editor.
Copyable journeys and reusable ideas
When you find a From/To pair and mode that you like, use the Copy link feature. It stores exactly those choices so you—or a collaborator—can regenerate the same journey later. This is handy if you’re building a series (e.g., multiple “Tokyo to Sydney” style long-hauls in different regions) and want consistent map visuals.
Clear limits so you can plan your workflow
Map Route is not trying to replace your full editor or act as a ticketing or booking tool. Knowing its boundaries helps you move faster:
- Each generate is exactly one From and one To—no multi-stop routing, no combining plane + train + road in a single file.
- There’s no built-in audio upload, beat sync, titles, B-roll, or voiceover.
- The km tracker is distance along the computed line, not travel time or official mileage.
- It’s not a real-time flight tracker, cruise tracker, or timetable.
You use Map Route for what it’s good at—fast map animation between two places—then stack your creative layers on top elsewhere.
Practical examples: from route idea to rendered clip
Example 1: Tokyo to Sydney by air corridor
Say you’re cutting a YouTube video about a big Pacific move or a long-haul trip. You want a clean map sequence to show the overall jump from Japan to Australia.
- Open maproute.org on your laptop with a wide browser window (for 16:9).
- Set From to Tokyo and To to Sydney.
- Choose Air corridor as your mode.
- Generate the journey and preview at 1x and 2x to see which pacing fits your planned voiceover.
- Download the video once you’re happy with the framing and speed.
You’ll get a landscape clip with an estimated air corridor arc, an animated marker, and an air corridor distance estimate in km. In your editor, place this near the start of your vlog, add titles like “Tokyo → Sydney”, and lay your music underneath.
Example 2: Paris to Lyon by rail-style alignment
Now imagine a short vertical Reel about taking the train from Paris to Lyon. You want a snappy 10–15 second route animation to open the clip.
- Open maproute.org on your phone (or narrow your desktop browser) to get a 9:16 aspect.
- Set From to Paris and To to Lyon.
- Choose Rail to visualize the railway alignment, if geometry is available.
- Generate the journey. If rail can’t be computed, switch to Road or Geodesic.
- Preview at 2x or 4x to get a quick, energetic route motion suitable for Reels.
- Download the video and import it into your vertical project.
In your editing app, you can overlay captions like “2 hours from Paris to Lyon” (even though Map Route itself isn’t giving you time data) and cut from the route animation straight into station B-roll.
Multi-leg trips: how to work around the two-point limit
If your story spans multiple stops—say, Tokyo → Sydney → Auckland—you’ll need to generate each leg separately. Map Route doesn’t have a multi-stop editor or a way to combine different modes in one file.
- Generate and download Tokyo to Sydney (Air corridor).
- Generate and download Sydney to Auckland (Air corridor, or another mode).
- In your editor, place the clips back-to-back, with a short crossfade or title card between them.
This approach also works if you’re mixing modes, like a rail segment followed by an air corridor. You simply stack separate Map Route clips on your timeline.
Optimizing your route renders for TikTok, Reels, and Shorts
Most social platforms reward fast, clear visuals. Map Route’s typical 8–28 second base duration is already in the right ballpark, but you can tweak how you generate and export to better match each platform.
Vertical-first workflow (TikTok, Reels, Shorts, Stories)
- Generate on a phone or in a narrow browser window so Map Route uses a 9:16 vertical canvas.
- Use 2x or 4x playback speed for shorter routes to keep the motion punchy.
- Keep your on-screen text in your editor away from the top and bottom edges so it doesn’t clash with the km tracker or watermark.
- For very short distances, consider Road or Rail so the map zooms in tightly and feels more detailed.
Once downloaded, drop the clip into your vertical project, add music, captions, and transitions in your usual editor. Map Route doesn’t handle any of those layers internally.
Landscape workflow (YouTube and horizontal feeds)
- Generate on a wide browser window to get a 16:9 route animation.
- Use 1x speed for long-haul arcs like Tokyo to Sydney so viewers can absorb the geography.
- Place the route clip near the start of your video as a context-setting shot, or in the middle when you change regions.
- Overlay titles and lower-thirds in your editor rather than trying to fit everything inside the map area.
If you want both vertical and horizontal versions of the same route, generate and export twice—once in each aspect. That way you avoid aggressive cropping later.
Using Map Route renders in a travel vlog workflow
Map Route is designed to slot into your existing editing pipeline, not replace it. Think of it as your dedicated route animation layer that you drop into Premiere Pro, Final Cut, CapCut, DaVinci Resolve, or whatever editor you use.
A simple vlog workflow might look like this:
- Plan your story beats and decide which segments need a map (e.g., each country jump or major train leg).
- Generate and download a Map Route clip for each relevant From/To pair.
- Import the clips into your editor and place them at scene transitions or chapter breaks.
- Add voiceover, on-screen titles, and B-roll around the route animation.
- Match music and pacing by trimming the Map Route clip or adjusting its playback speed in your editor.
Audio and timing considerations
Map Route does not support audio upload, beat-sync, or soundtrack matching. All audio work happens downstream in your editor. Because the base duration is distance-based, it’s usually close to usable out of the box, but you can still:
- Cut the clip shorter in your editor if you only need part of the route motion.
- Speed it up or slow it down slightly in your editor to better align with a music beat.
- Loop the clip if you need a longer background while you speak.
For narrative clarity, it often works well to start your narration just before the marker begins moving, then end your sentence right as it reaches the destination.
Map Route vs traditional route animation tools
If you’ve ever tried to build a travel route animation from scratch in a full motion graphics suite or a mobile app, you know how much time can disappear into keyframes and exports. Map Route takes a different, browser-first approach.
| Tool | Setup & Access | Route Creation Style | Export & Watermark | Best For |
|---|---|---|---|---|
| Map Route (maproute.org) | Browser-based, no install; works on modern desktop and mobile browsers | Search From/To, choose one of four modes (Road, Rail, Air corridor, Geodesic); automatic framing and animation between two points | Browser capture to MP4 or WebM with a visible “Made with MapRoute.org” watermark; still image export as WebP | Creators who want fast, clean route animations to drop into existing edits |
| Desktop motion graphics software (e.g., After Effects with map plugins) | Requires install, licenses, and often plugins; more complex setup | Manual keyframes, camera paths, and map styling; can support multi-stop and fully custom motion with enough work | Exports controlled by the host app; watermark depends on plugin/licensing | Studios or advanced editors needing deeply customized, branded map sequences |
| Mobile route animation apps (e.g., travel route story apps) | Phone app install; may require subscription or in-app purchases | Tap-to-add stops on a simplified map; often optimized for quick social stories | Exports vary by app; some free tiers add watermarks or resolution limits | Casual creators making quick, stylized route clips entirely on mobile |
Map Route sits in a sweet spot for many travel creators: more geographic accuracy and control over modes than many lightweight mobile apps, but far less setup and complexity than a full motion graphics stack. The trade-off is intentional—no multi-stop editor, no custom camera moves, and no watermark-free export, in exchange for speed and simplicity.
Creator checklist for smooth route renders and exports
Before you generate
- Decide the exact two endpoints you want to show (From and To).
- Choose the visualization mode that best matches your story (Road, Rail, Air corridor, or Geodesic).
- Pick your aspect ratio by device: phone/narrow window for 9:16, wide window for 16:9.
- Log in with a verified account if you plan to download video or images.
- Check your daily usage: free verified accounts have 5 combined uses per UTC day (generate + download + export image).
While generating and previewing
- Watch the full animation at 1x to confirm framing and legibility.
- Test 2x or 4x speed to see what feels right for your intended platform.
- Confirm the km tracker label matches your chosen mode (road path km, railway geometry km, air corridor estimate km, or geodesic km).
- If road or rail fails, accept the geodesic suggestion or switch modes.
- Use Copy link for any journey you might want to regenerate later.
After export, in your editor
- Import the MP4/WebM clip and place it at your planned story beat.
- Add titles, captions, and lower-thirds in your NLE—Map Route doesn’t handle these.
- Lay in music and adjust clip length or speed to match your audio.
- Combine multiple Map Route clips to represent multi-leg trips or mode changes.
- Review the final render to ensure the Map Route watermark and km tracker are visible and not obscured by other overlays.
FAQ
Does Map Route really render travel route videos instantly?
Map Route generates route animations very quickly because it focuses on a single task: visualizing the geography between two places. Once you enter a From and To, choose a mode, and click Generate Journey, the tool fetches geometry, frames the map, and prepares the animation in your browser. Exporting the video is a browser capture of that animation, so the whole process is typically minutes rather than the longer setup and render times you might see in full desktop motion graphics software.
Can I use Map Route on my phone as well as my computer?
Yes. Map Route works on modern browsers on both phones and desktops. Place search, Generate Journey, and the player controls (Play, Pause, Replay, speed 1x/2x/4x) all work on mobile and desktop. Remember that the aspect ratio follows your window width: phones and narrow windows produce 9:16 vertical clips, while wider windows produce 16:9 landscape clips.
What video format do exports use, and is there a watermark?
When you click Download Video with a verified account, Map Route performs a browser capture of the journey player you’re watching and saves it as a video file. Where your browser supports it, the format is MP4 (H.264); otherwise, it falls back to WebM. All video and image exports include a visible “Made with MapRoute.org” watermark—there is currently no watermark-free export option.
Is Map Route free to use, and are there limits?
Map Route is free to use, with some fair-use limits. Logged-out visitors can Generate Journey up to 3 times but cannot download images or videos. With a verified free account, you get 5 combined uses per UTC day—each Generate Journey, Download Video, and Export Image counts as one use, and the count resets at the next UTC day. Paid plans exist only as a manual upgrade via the account page; there is no self-serve checkout at the moment.
Can I create multi-stop or multi-mode routes in a single Map Route video?
No. Each Map Route generate is exactly one From and one To, using a single visualization mode. There is no multi-stop waypoint editor, and you cannot combine plane, train, and road in one Map Route file. To show a multi-leg trip, generate each pair of stops separately (for example, Tokyo → Sydney and then Sydney → Auckland) and then combine the exported clips in your video editor.
Does Map Route support audio, beat sync, or adding text overlays?
No. Map Route is not a full video editor. It doesn’t support audio upload, music, beat sync, titles, captions, or B-roll. The recommended workflow is to use Map Route to generate and export the map animation, then bring that clip into your usual editing software to add voiceover, music, text, and other visual layers.
How accurate are the routes and distances in Map Route?
Map Route visualizes routes based on public mapping data and routing engines. Road mode uses a typical road path from a routing engine; Rail uses railway geometry when available; Air corridor uses an estimated great-circle line; and Geodesic uses a straight-line distance on the globe. The km tracker shows the length of the computed line and is labeled accordingly. It’s not driving time, a bookable itinerary, or an airline’s official mileage, and it doesn’t guarantee that a specific bus, train, or flight actually operates between those locations.
What happens if Map Route can’t find a road or rail route between my cities?
If Map Route cannot compute road or rail geometry between your chosen From and To, the player will show a message and offer a geodesic alternative—a straight-line path between the two places. You can accept that geodesic mode or switch to Air corridor or another mode that better fits your story. There is no cruise-ship, ferry, or bus-service mode in the current product.